I have so many pending crochet projects! Another little monster is on the way, a cat, a teddy... My problem is I start things then get bored with them and start something new. Don't worry, I do go back to them and end up finishing them off eventually :-)
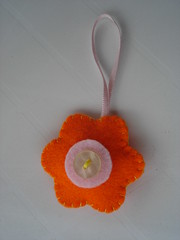
I keep lots of my photos on flickr, and it's also a great place to get inspiration. A fellow flickr crafter, Eloisa, has made some very nice comments on my crochet, and I went to have a look at her photostream too. She is so clever! I especially love the things she does with felt, and that inspired me to make this little felt flower. It's not as good as Eloisa's but was very quick to make and I think it's rather sweet, and not bad for a first time.
Saturday, 28 August 2010
Thursday, 26 August 2010
Froggy finger puppet pattern
This is a very quick and easy pattern. I used Phildar cotton/bamboo yarn, equivalent to DK, and sew-on 8 mm goggly eyes. Don't use the goggly eyes if you're going to give this finger puppet to a very young child as they do represent a choking risk. You'll also need a short strand of black embroidery thread for the mouth.
These are the stitches used:
ch = chain
sc = single crochet (double crochet in UK terms)
ss = slip stitch
For instructions on how to make a magic ring, there is a great video here.
Start with a magic ring
rnd 1 - 6 sc into magic ring
rnd 2 - 2 sc in each st around (12 sts)
rnd 3 - [1 sc in next 2st, 2 sc in next st] rep around (16 sts)
rnd 4 - *1 sc in next 4 st, ch 5, ss in 5th ch from hook, rep from *, 1 sc in next 8 st to end
rnd 5 - 1 sc in each st, pulling the "eyes" towards you as you go (16 sts)
rnd 6 - 1 sc in next 4 st, 2 sc in next st (below the eye), 1 sc in back look pf next 3 sts, 2 sc in next st (below the eye), 1 sc in next 7 st, to end (18 sts)
rnd 7-9 - 1 sc in each st around (18 sts). Now is a good time to embroider the mouth.
rnd 10 - 1 sc in next 6 st, *10 ch, 1 ss in 6th ch from hook, 1 ss in next 4 ch, 1 sc in next 6 st, rep from * once
rnd 11-15 1 sc in each st around (18 sts)
rnd 16 - 1 sc in next 8 st, *12 ch, 1 ss in 6th ch from hook, 1 ss in next 6 ch, 1 sc in next 6 st, rep from * once, 1 sc in each of next 4 sts, fasten off, weave in ends.
Sew a goggly eye on each "eye". Enjoy playing with your froggy finger puppet!
Monday, 23 August 2010
Monster!
Here's my latest project, which I finished off this morning. I got the free pattern for this "bubble leg monster" right here: http://www.craftbits.com/project/amigurumi-bubble-leg-monster.

As I mentioned in my previous post, this little fellow is completely lined and can go in the washing machine without any fear of losing its stuffing. I'm seriously thinking of making another one - I have enough yarn left to make it a negative-positive friend with a blue body. The photo doesn't really do this little monster justice as far as the colour is concerned, it's a gorgeous highligter fluorescent yellow, pity it doesn't shine in the dark.
Any ideas for a name, by the way?
Tuesday, 17 August 2010
Lining my monster
I know that in theory, for amigurumi crochet stitches, you have to use a much smaller hook than is usually recommended for a given yarn size. The idea is that the stitches will be very close together and any stuffing will not be able to escape through the holes. The reality, however, is a different story. I recently machine washed one of my toys before giving it away and the polyester fibrefill that I had stuffed it with really did want to get out. There were little fluffy bits all over.
When I made the little ball for baby Alfie, I wanted to be sure the stuffing wouldn't escape, so I enclosed it in the end of a nylon stocking. The result is great. It was easy because it is just a round ball shape, so no need to deal with fiddly small limbs.
I'm in the middle of two projects at the moment, and I've decided to line them too. One of them is almost finished so I should be posting it in the next day or two. Lining it not only helps for washing, it also means that when you're finishing off, your hook doesn't get mixed up with the fibrefill. So good news all round. Yes, you do have to make the lining and sew it up too, but it really is worth it.
Any experience with lining or not, and are there any disadvantages with lining that I've not thought about?
Friday, 6 August 2010
Sally
I've not been on my blog for a while, as I took a much-needed break and a great trip to London with my son. We're back now and I've been inspired by that little snail I found, and made myself Sally. I used the same spiral pattern as on Alfie's ball, and made a simple head and body in white, with embroidered eyes and mouth in the same blue as the shell.
We're having some visitors tomorrow, including a little girl, and I'm wondering if Sally will still be living here with us after that.

We're having some visitors tomorrow, including a little girl, and I'm wondering if Sally will still be living here with us after that.
Subscribe to:
Posts (Atom)