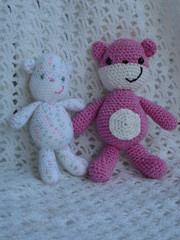
Here, as promised, is the pattern for the chubby teddies. I made the small one with fine baby yarn and a 3mm hook, and the pink and white one with thicker yarn and a 3.5mm hook.
Now for the official bit:
Please do not sell this pattern. Do not post this pattern to any website, but link directly to my blog. No file sharing of this pattern.
I would also love to see your creations, and please do leave a comment.
Head
Start with a magic ring
rnd 1 - 6 sc into magic ring
rnd 2 - 2 sc in each st around (12 sts)
rnd 3 - [2 sc in next st, 1 sc] rep around (18 sts)
rnd 4 - [2 sc in next st, 2 sc] rep around (24 sts)
rnd 5 - [2 sc in next st, 3 sc] rep around (30 sts)
rnd 6-8 - sc around (30 sts)
rnd 9 - [2 sc in next st] three times, sc in next 12 sts, [2 sc in next st] 3 times, sc in next 12 sts (36 sts)
rnd 10 - sc around (36 sts)
rnd 11 - sc in each of next 3 sts, [2 sc in next st] three times, sc in next 3 sts, sc2tog, sc in next 3 sts, sc2tog, sc in next 3 sts, sc2tog, [2 sc in next st] three times, sc in next 3 sts, sc2tog, sc in next 3 sts, [sc2tog] twice (36 sts)
rnd 12 - sc around (36 sts)
Change to white yarn
rnd 13-15 - sc around (36 sts)
rnd 16 - [1sc in next 4 sts, sc2tog] rep around (30 sts)
rnd 17 - sc around (30 sts)
If you use safety eyes, now is a good time to fix them. You can also now embroider the nose and mouth with black embroidery thread.
rnd 18 - [1sc in next 3 sts, sc2tog] rep around (24 sts)
rnd 19 - sc around (24 sts)
rnd 20 - [1 sc in next 2 sts, sc2tog] rep around (18 sts)
rnd 21 - [sc2tog, 1 sc in next 2 sts] rep around (13 sts)
Stuff!
rnd 22 - [1 sc in next st, sc2tog] rep around (9 sts)
rnd 23 - [sc2tog] 4 times
Fasten off, leaving a long tail to sew the head to the body
Ears (make 2)
Start with a magic ring
rnd 1 - 6 sc into magic ring
rnd 2 - 2 sc in each st around (12 sts)
rnd 3 - sc around (12 sts)
rnd 4 - [sc2tog], rep to end (6 sts)
rnd 5 - [sc2 tog] twice
rnd 5 - [sc2 tog] twice
Fasten off, leaving a long tail to sew the ears to the head
Body
start with a magic ring
rnd 1 - 6 sc into magic ring
rnd 2 - 2 sc in each st around (12 sts)
rnd 3 - [2 sc in next st, 1 sc] rep around (18 sts)
rnd 4 - [2 sc in next st, 2 sc] rep around (24 sts)
rnd 5 - [2 sc in next st, 3 sc] rep around (30 sts)
rnd 6 - sc around (30 sts)
rnd 7 - [2 sc in next st, 4 sc] rep around (36 sts)
rnd 8 - [2 sc in next st, 5 sc] rep around (42 sts)
rnd 9-12 - sc around (42 sts)
rnd 13 - [1 sc in next 4sts, sc2tog] rep around (35 sts)
rnd 14 - sc around (35 sts)
rnd 15 - [1sc in next 3 sts, sc2tog] rep around (28 sts)
rnd 16-18 - sc around (28 sts)
rnd 19 - [1sc in next 2 sts, sc2tog] rep around (21 sts)
rnd 20 - sc around (21 sts)
Stuff!
rnd 21 - [1sc in next st, sc2tog] rep around (14 sts)
rnd 22 - [sc2tog] to end.
Leave a long tail of yarn, weave it through the remaining stitches, draw up and fasten off.
Arms (make 2)
start with a magic ring
rnd 1 - 6 sc into magic ring
rnd 2 - 2 sc in each st around (12 sts)
rnd 3-7 - sc around (12 sts)
rnd 8 - sc2tog, 1 sc in next 8 sts, sc2tog (10 sts)
rnd 9 - sc around (10 sts)
Stuff!
rnd 10-14 sc around (10 sts) (don't stuff the tops of the arms)
Fasten off, leaving a long tail of yarn to sew the arms to the body.
Legs (make 2)
start with a magic ring
rnd 1 - 6 sc into magic ring
rnd 2 - 2 sc in each st around (12 sts)
rnd 3 - [2 sc in next st, 1 sc] rep around (18 sts)
rnd 4-5 - sc around (18 sts)
rnd 6 - 1 sc in next 2 sts, [sc2tog] twice, 1 sc in next 5 sts, 2sc in next 2 sts, 1 sc in next 5 sts (18 sts)
rnd 7 - 1 sc in next 2 sts, [sc2 tog] twice, 1 sc in each st to end (16 sts)
rnd 8 - same as rnd 7 (14 sts)
rnd 9 - same as rnd 7 (12 sts)
rnd 10-14 - sc around (12 sts) or if you prefer shorter legs, finish at row 12.
Stuff the legs in their whole length.
Stuff the legs in their whole length.
Fasten off, leaving a long tail of yarn to sew the legs to the body.
Tummy (optional)
Using white yarn.
Start with a magic ring
rnd 1 - 6 sc into magic ring
rnd 2 - 2 sc in each st around (12 sts)
rnd 3 - [2 sc in next st, 1 sc] rep around (18 sts)
rnd 4 - [2 sc in next st, 2 sc] rep around (24 sts)
rnd 5 - [2 sc in next st, 3 sc] rep around (30 sts)
To assemble and finish off:
If you haven't already embroidered the nose and mouth, now is the time to do it.
Stitch each ear closed and then sew to each side of the head.
Stitch each arm top closed and then sew to each side of the body.
Sew the legs to the bottom of the body.
Sew the tummy to the tummy!
SWEET! The *cutest* patterns are always the ones generous folks like you offer for free. :>D
ReplyDeleteI love all your creations..
ReplyDeleteAt the moment it's a close contest between Chubby Bear and Elise..
I wish I'd learnt to do something like this...I have no spare time now. All those evenings on my own before Jack when hubby worked away...what did I do..watch rubbish on tv...I did learn how to do cross stich and still do some now (when I have time)
C x
Well Clare this is all very recent for me though I have known how to crochet since I was little.
ReplyDeleteI'm working on a new project but it's still early days yet. Let's just say... a famous cat that likes lasagna ... watch this space!
Garf.....wow how cool will that be?!
ReplyDeleteI added this project and thumbnail to our site and linked to you. We are looking for more amigurumi as well as other crochet patterns, so if you have any similar projects please feel free to let me know.
ReplyDeleteChristine
cweiher@primecp.com
Editor, www.AllFreeCrochet.com
very cute teddy bear!! I have a question with the head pattern round 11. I tried to follow the pattern and I am only getting 30 stitches instead of 36. Please help! Thank you!! =D
ReplyDeletesorry... one more question. The head pattern round 21 doesn't equal 15 stitches. What am I doing wrong?
ReplyDeleteHi Sharon,
ReplyDeleteSorry about the problems in the pattern. I'm going to make another teddy myself in the next few days and I'll make any necessary changes to the pattern asap.
At last I've made the necessary alterations to the chubby teddy pattern. I hope it's clearer now. I've corrected row 11 and reviewed some of the numbers of stitches per row. I'll soon be posting the chubby teddies' new friend, chubby panda, who helped me a lot in re-checking and correcting the pattern :-)
ReplyDeleteVery cool .. I luv the bears I'm working on em :-)
ReplyDeleteSo the arms are suppose to be only half stuffed?
Thanks Aemy. Yes you should only stuff the "hands" or the arms will stick out too much :D
ReplyDeleteOk thank u :-)
ReplyDeleteHey , I counted the stitches of the legs round 6 and it doesn't equal 18 stitches ... Am I doing sumthing wrong? Im sry just confused please lemme no :-)
ReplyDeleteI'm so sorry! When I made chubby panda last week I thought I'd fixed all the problems, but I missed this one.
ReplyDeleteI put the square bracket in the wrong place: Instead of
[1 sc in next 2 sts, sc2tog] twice, 1 sc in next 5 sts, 2sc in next 2 sts, 1 sc in next 5 sts (18 sts)
it should read:
1 sc in next 2 sts, [sc2tog] twice, 1 sc in next 5 sts, 2sc in next 2 sts, 1 sc in next 5v
sts (18 sts).
Thanks for the feedback, it's a great help to me and all those who want to use the pattern. I'm going to correct the pattern itself right now.
Thank u so much :-)
ReplyDeleteit all makes sense now hehe
no problem it's all good ;-)
U don't stuff the legs ? Lol im sry just wanna make it clear :-)
ReplyDeleteHi Aemy, yes I do stuff the legs lol. And I sew them on without "flattening" the ends. Hope this makes sense! I'm going now to correct the pattern ... again.
ReplyDeleteLol thanks so much I feel like I'm bothering u :-P
ReplyDeleteAnyways I'm almost done my bear !!!! Mwahah:-)
You're not bothering me! On the contrary, it's great to have someone help me to correct the remaining glitches in the pattern :)
ReplyDeleteIt would be great if you could give a link to a photo of your finished bear, I'd love to see it ^__^
Hi! I was wondering how you sewed the mouth on. I'm having difficulties with it. Can you please edit your thing on how you sewed your mouth and eyes, or tell me how :/ I need to know before I give this teddybear as a gift
ReplyDeleteHi Pirou,
ReplyDeleteI used backstitch to embroider the mouth. I did it a bit too big on the pink/white teddy, it's better on the smallest one, and on chubby panda. I used the same thread as for the nose, you can use thinnish yarn or embroidery thread. It may be a good idea to mark it in tailor's chalk first. I hope this helps.
thank you so much for sharing this pattern.
ReplyDeleteIt is very simple and easy to make.
I put a link in my blog to your pattern ok?
thanks,
marlene
Hi marlene and thank you for your comment, I love to hear when people are making toys from my patterns. Your teddy is very sweet, thank you for the link on your blog.
ReplyDeleteWhat is a magic ring? I crochet a lot and haven't seen this term before.
ReplyDeleteHi, there is a good video on youtube that gives instructions for the magic ring http://www.youtube.com/watch?v=WLuSVyKvoUg
ReplyDeleteHope this helps.
This comment has been removed by a blog administrator.
ReplyDeleteThis comment has been removed by a blog administrator.
ReplyDeleteLove your sweet patterns... and they are FREE... Thank you. Going to make the teddy and rattle for my new grandson Mason... :-D
ReplyDeleteIt's a pleasure :) I hope your little grandson will love his new toys!
DeleteThis comment has been removed by a blog administrator.
ReplyDeleteCAnt wait for the panda one to make for my daughter for christmas thank you for this one and looking forward for the panda
ReplyDelete