A few weeks ago I met Aral Balkan at a communications meeting. He is the man behind the Feathers app for iPhone. Feathers brings a whole new life to tweeting.
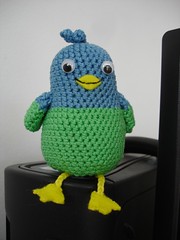
With the app you can use novel fonts, pictures and even coded messages, using Twitter, facebook, msn or simple texting. The cute Feathers bird shows the app user how much they've used their character limit. As the limit draws near, the little blue bird becomes green. And if you overstep the limit, it becomes red. My little bird has used a bit more than half the character limit, so it's still blue but slowly becoming green. You can see the real thing on the app, for more information tweet @aral, or see more about it on feathersapp.com.
My version of the feathers bird isn't really suitable for young children because of the small parts. If you want to give it to a child, please make sure you adjust the pattern to make it safe, especially as regards the eyes and feet.
Here's the pattern:
Stitches used:
sc single crochet
ss slip stitch
dc double crochet
hdc half double crochet
I used Catania cotton and a 2.5 mm crochet hook, and scraps of yellow felt for the beak and feet.
Head feather
Start with the head feather, which you will later attach to the top of your bird.
With blue, ch 12, turn.
Work 2 sc into each ch to end. Fasten off, leaving a long tail to sew the head feather to the inside of the head.
Head and body
Rnd 1 - With blue, work 6 sc into a magic circle.
Rnd 2 - 2 sc into each st (12 sc)
Rnd 3 - * 1 sc in next st, 2 sc in next st, rep from * to end (18 sc)
Rnd 4 - * 1 sc in next 2 sts, 2sc in next st, rep from * to end (24 sc)
Rnd 5 - * 1 sc in next 3 sts, 2sc in next st, rep from * to end (30 sc)
Rnd 6-13 - sc around
Rnd 14 - * 1 sc in next 4 sts, 2sc in next st, rep from * to end (36 sc)
Rnd 15 - sc around
Now's a good time to attach the head feather by threading it through the small hole at the middle of the initial magic circle. Sew it firmly to the inside so it can't be pulled off!
Sew on the eyes and the beak. I used sew-on goggly eyes because I found they resembled the original bird the most, but you can use safety eyes, or sew on felt eyes, or just embroider them if you prefer. For the beak I used a small piece of yellow felt and embroidered the smile :)
Continue in green.
Rnd 16 - * 1 sc in next 5 sts, 2sc in next st, rep from * to end (42 sc)
Rnd 17-24 - sc around
Rnd 25 - * 1 sc in next 5 sts, sc2tog, rep from * to end (36 sc)
Rnd 26 - sc around
Rnd 27 - * 1 sc in next 5 sts, sc2tog, rep from * to end (36 sc)
Rnd 28 - * 1 sc in next 4 sts, sc2tog, rep from * to end (30 sc)
Rnd 30 - * 1 sc in next 3 sts, sc2tog, rep from * to end (24 sc)
Rnd 31 - * 1 sc in next 2 sts, sc2tog, rep from * to end (18 sc)
Stuff!
Rnd 32 - * 1 sc in next st, sc2tog, rep from * to end (12 sc)
Rnd 33 - sc2tog 6 times, draw the yarn through remaining stitches and pull closed. Weave in ends.
Wings (make 2)
Rnd 1- with blue, ch 14, join to first ch with a ss to make a ring.
Rnd 2 - 2ch, 1 dc in each chain to end , join to the top of 2 ch (14 dc)
Continue in green.
Rnd 3 - 1 sc in each st (14 sc)
Rnd 4 - [sc2tog, 1 sc in next 5 st] twice (12 sc)
Rnd 5 - [sc2tog, 1 sc in next 4 st] twice (10 sc)
Rnd 6 - sc around
Rnd 7 - sc2tog 5 times.
Finish off leaving a tail of yarn, weave the yarn through the last 5 sts, pull tight to close. Weave in ends.
Tail
Rnd 1 - With green, work 12 dc into a magic circle
Rnd 2 - 2 dc into each st (24 dc)
Now fold it in half so it makes a semi-circle shape and work into both layers of stitches, joining them together.
Rnd 3 - 2 ch, skip the first st, 1 hdc in next 3 st, 1 dc in next 4 st, 1 hdc in next 4 st to end. Fasten off, leaving a tail of yarn to sew the tail to the body.
Legs and feet (make 2)
With yellow, ch 10. Fasten off, leaving a tail of yarn to sew the leg to the body.
With yellow felt, cut out four feet shapes, and make a small split in two of them at the heel end (these are the tops of the feet). Attach the end of the chain in the split, sew it in place, and then sew the bottom pieces of felt to the tops with blanket stitch all around.
Sew the legs to the bottom of the bird.
Sew the wings in place, aligning the blue/green separation with the one on the body.
Sew the tail to the back.
You can of course make the bird all in blue, or alter the green/blue limit. You could even make a red/green bird, or a totally red one. See the app for further inspiration, and please leave me a comment if you make one of these little guys. I would love to see your photos too!
If there are any problems with the pattern, please let me know.
Extremely cute Ami pattern. Thanks so much for sharing Feathers with all of us.
ReplyDeleteI love it. My friend has MS and need something to keep her fingers from digging into her palms...this bird pattern is perfect. Thanks for sharing
ReplyDeleteThank you for your comments, and I'm really glad you like the pattern.
ReplyDeleteReally cute bird, good job!
ReplyDeleteAckkk, so excited to find your blog!
ReplyDeleteI totally understand about appreciating a comment or two. ;-)
Thank you Danielle, and welcome :)
ReplyDeleteyurtdışı kargo
ReplyDeleteresimli magnet
instagram takipçi satın al
yurtdışı kargo
sms onay
dijital kartvizit
dijital kartvizit
https://nobetci-eczane.org/
CNWQ
Hi nicee reading your blog
ReplyDeleteSo glad to see!
ReplyDeleteمكافحة حشرات LczBTwJQxe
ReplyDelete