Saturday 30 April 2011

Little shoes in little boxes

Little cotton shoes in their box
More about these down below...
Well our weather has cooled down a bit this week - not a bad thing in my opinion. Of course everyone likes to have an early summer with deliciously warm temperatures, but it seems to have sprung from winter straight into summer without passing by spring. My strawberry plants are still thriving. There are some little green strawberries on them now, but with the cooler weather, I need to find a way to protect them from the damp soil. I remember my dad used to use straw, but I don't have any straw! I'm wondering if there's anything recyclable that would do the job. Any ideas? In the meantime I took this photo a couple of days ago when it was still very sunny - I think they look lovely from this angle. Tomorrow we're planning to buy some cherry tomato plants to put in some bigger pots on the balcony, despite the cooler weather.


Today I went into the chic shop I got past every day on my way to work and showed the shop owner my rainbow sandals. It was a bit late in the day so we didn't have time to talk for long, but she admired the little shoes and we've agreed that I should pass by another day and discuss what she can do for me. She's also going to advise me of the cost and has kind of offered to put them on display in her shop, and give people details of how to buy or order a pair directly from me. Wasn't that nice of her?

Baby sandals in organic cotton

I have made another pair of these baby shoes - this time with organic cotton yarn. It's a bit thicker than my usual Catania yarn, so even though I used the same size hook, the finished shoes are a little bit bigger.  They're for my friend's baby boy who is four months old.

Following a question in the comments, I've taken a few (not very good quality) photos of how I make the strap. I hope this will make it a bit clearer.

First of all, make 18 ch (and when you join the other colour, do it more carefully than I did!)

Then dc back up the chain, and onto the heel of the shoe, until the marker
When you get to the marked stitch, work another 18 ch
Then dc back towards the shoe and attach the yarn to the base of the dc remaining on the heel

Now you just need to weave in the ends and add buttons and hey, presto!

I have a very old stash of children's magazines in French that my middle daughter was subscribed to when she was about six. For a while now I've been wondering what I could do with them, and then early this morning I had a brainwave! My initial plan was to use them to cover boxes I would make with old cereal boxes. But that would mean lots of measuring and cutting out and gluing and it seemed far too much like hard work. This morning's brainwave was a single word - ORIGAMI! And look at what I came up with:

Little open box

Little closed box

Organic cotton and recycled paper box

The origami pattern I found is so, so easy. Since I made the box in the photos I've made two more. It would be more accurate to say I've made six boxes, actually, as you need two boxes when you count the lid, each of which is made separately. The pattern is the same, you just make the lid a bit bigger by starting off with a bigger square. Here's the page I chose (the video is especially useful), but if you just type origami box in any search engine you'll get lots of examples. The ones I've make with my comic book pages is just the right size for the baby shoes, so I'll be able to send them to my friend in their very own box. Cost of box - nothing at all, and it's recyclable. Oh and I forgot to mention that my wrist is a lot better. Happy, happy, happy.

Saturday 23 April 2011

Back to crochet with a bunny rattle


Bunny rattle
Originally uploaded by aishakenza
I have had the permission from my physiotherapist to do a little bit of crochet, as long as I don't experience any pain.
So, very slowly, I have been making this little rabbit. It's a rattle for my friend's baby.
This kind of project would usually take me one afternoon, but as I've been taking things very slowly it took me about four days to complete.
I had recuperated a rattle from the inside of another very old toy before throwing it away and it was a perfect fit for the bunny's head. I used some yarn from my stash - a slightly shiny, slightly stretchy yarn that made a nice soft finish. I embroidered the eyes and mouth so there's nothing dangerous for the baby, and I also lined the head and body so there's no chance of the stuffing coming out.
Oh I almost forgot, if you want to make a rabbit like this one, you can get the pattern here.

Friday 15 April 2011

Baby rainbow sandals


Baby rainbow sandals
Originally uploaded by aishakenza
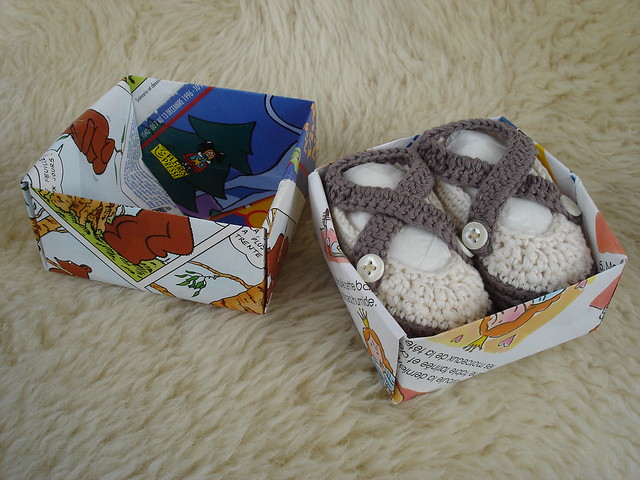
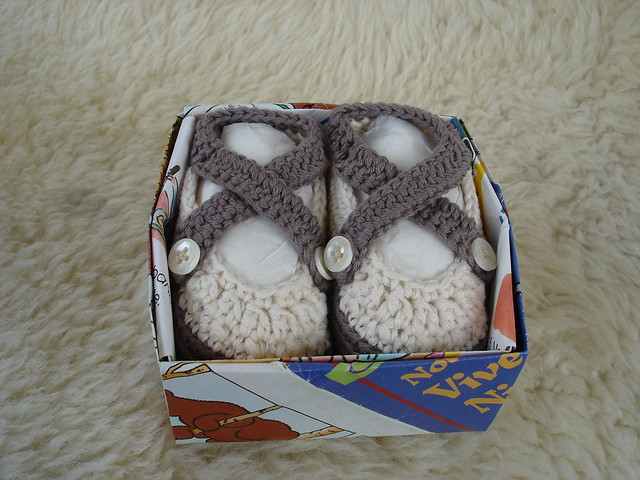
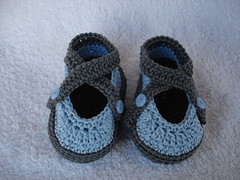
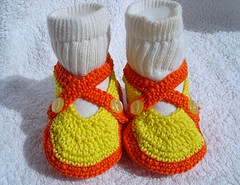
I've called these baby rainbow sandals because of the yarn I've used to make the most recent pair (Catania Color). However you can make them in a plain colour or two colours. I've indicated where to make the colour changes if you want to make the two-colour version (for a two-colour version see this post).

These baby sandals are 10 cm/4 inches long so size 3 months approx. I have used Catania cotton yarn and a 3mm crochet hook and a tension of 6 sc and 6 rows of sc to an inch/2.5 cm. I did work the sole a bit looser, though. You can probably use the same pattern and thicker yarn for larger sizes but I haven't tested for them yet. If I do, I'll add the details later.

The sandals are worked in a single piece - the only things you need to sew on are the buttons. If you discover anything odd or any changes that would improve the pattern, please let me know.

I have used US terms for this pattern (even though I'm British) as most visitors to my blog seem to hail from the USA. The UK stitch name equivalents are:

US sc = UK dc
US dc = UK tr

Please do not sell this pattern or post it to any website. Please link directly to my blog instead. No file sharing of this pattern. If you use the pattern, I would love to see your creations!

So here we go:

Start with 15 ch.


rnd 1:  1 sc in third chain from hook, 1 sc in each of next 11 chs, 3 sc in next chain, then work 12 sc down the other side of the row of chs. (27 sts)

rnd 2: 2 sc in the next st (mark the first of these 2 sts, and continue to mark the first st of each rnd as you work)1 sc in each of next 12 sts, 2 sc in each of next 3 sts, 1 sc in each of next 12 sts to end. (32 sts)

rnd 3: 1 sc in next st, 3 sc in next st, 1 sc in each of next 12 sts. [1 sc in next st, 2 sc in next st] three times, 1sc in each of next 12 sts to end. (37 sts)

rnd 4: 1 sc, 2 sc in each of next 3 sts, 1 sc in each of next 12 sts. [2 sc in next st, 1 sc in each of next 2 sts] three times, 1 sc in each of next 12 sts to end. (43 sts)

rnd 5: 1 sc, [ 1 sc in next st, 2 sc in next st] three times, 1 sc in each of next 12 sts, [1 sc in each of next 3 sts, 2 sc in next st] three times, 1 sc in each of next 12 sts to end (49 sts)

rnd 6: 1 sc, [2 sc in next st, 1 sc in each of next 2 sts] three times, 1 st in each of next 12 sts, [ 1 sc in each of next 4 sts, 2 sc in next st] three times, 1 sc in each of next 12 sts to end. (55 sts)

rnd 7-10: working in back loop only, 1 sc around (55 sts)

If you're making two-colour shoes this is where you should change colour.


(I've made a small photo tutorial on how to crochet the strap on this post)

rnd 11: still working in the back loop only, 1 sc in each of next 26 sts, [sc2tog, 1 sc in each of next 6 sts] twice, sc2tog, 1 sc in each of next 11 sts to end (52 sts)

rnd 12: working in both loops, 1 sc in each of next 24 sts, [sc2tog, 1sc in next st] six times, 1sc in each of next 10 sts to end. (46 sts)

rnd 13: 1 sc in each of next 24 sts, [dc2tog] six times, 1 sc in each of next 10 sts to end. (40 sts)

rnd 14: sc around (40 sts)

rnd 15 and strap: 1 sc in each of next 16 sts (this is where to change colour if you're making the two-colour version), 18 ch. *1 dc in 3rd ch from hook, 1 dc in each chain**, then 1 dc in each of next 16 sts. 18 ch and rep from * to **. Fasten off, leaving a tail of yarn to attach to the base of the last dc worked on the body of the shoe. Sew two buttons on each shoe.

Pattern changes - please make sure you've got the latest version.
(I just corrected the last row - had got confused with my scs, dcs and trs, sorry!)
(I've included where to change colour for the strap on the two-colour version)
(I made a correction to row 2 where sc/dc confusion had struck again)
(I corrected the hook size - you should use a 3mm hook)

Three weeks!

I went for some physiotherapy on my wrist today and the physio seemed to know a lot more about the possible damage done than my GP did. I suppose that's normal as the physio's a specialist in joints, bones, tendons, etc. Well to cut a long story short, she told me it could take three weeks for me to get normal painfree movement in my right wrist! I have decided to do everything I can to let it get better quickly, so no more crochet for another three weeks...

I am now quite good at one-handed typing so I can still post to my blog, and over the last few days I have been typing up my baby shoes patttern so I'll post that very soon, together with the cutest pair I've made yet (finished just before my wrist accident).

And I'm sure I'll find other bits and bobs to post about too. What's three weeks in a lifetime?

Friday 8 April 2011

Feeling sorry for myself


If I'm feeling sorry for myself, it's not because of the view from my kitchen window.


If I'm feeling sorry for myself, it's not because the strawberry plants on my balcony are bursting into flower.


It's not because of the view from the balcony either.

I'm feeling sorry for myself because I've injured my right wrist and I can't draw, write, sew or crochet. Typing is a slow, one-handed process and... it hurts!

Luckily the weather is glorious and the weekend is here. But no more crochet? Aaaarrrggghhhh!

Baby shoes blue/grey


Baby shoes blue/grey
Originally uploaded by aishakenza

Here's my second attempt of the baby shoes. They are very small - 0-3 months, perfect for a summer baby! I have simplified and shortened the pattern but haven't had time to write it up yet, so you'll have to be patient for a little longer. I'm presuming that you do want this pattern, or are you willing to wait for mk III?

Sunday 3 April 2011

A weekend in orange and yellow


Baby shoes
Originally uploaded by aishakenza
I have had (and am still having!) a lovely hooky weekend - and a long one too. I didn't work on Friday and I've had plenty of time to finish off some crochet and sewing.
First of all, these little tiny shoes for my newest great-niece. I wrote the pattern as I went along, but I'm not going to reproduce it here yet, because first of all I would like to simplify it a bit (and I also want to make a similar pair in DK wool). I think they look so joyful in these bright colours.

Felt chick brooch

In the same yellow/orange theme, I've made an addition to my collection of owl brooches with their cousin, Little Yellow Chick.
You may have noticed the green woolly background to the little chick. Guess what it is? I'm going to tell you: it's part of the planned Jolly Green Giant socks for my OH. But bad news, I'm afraid. I've decided not to finish them. They were becoming very thick and fluffy, and I was worried they would end up on this blog. So OH isn't going to look like the Jolly Green Giant any time soon. Actually, he doesn't really mind :D.

Just a little word about comments


I'm so thrilled by the springtime sunshine and my latest projects, but before I post about them I just wanted to add a special post on ... comments.
I know (hope!) there are lots of people who read my blog but who choose not to make any comments, and that's fine. But if you would like to leave a comment but haven' t been able to, now you can!
Thanks to the kind advice of a friend and fellow blogger, I have enabled the comments so you can use them, even if you don't own a google, yahoo, etc, account. Just click on the comments link below, and in the drop-down list "Comment as" select Name/URL. If you don' t have a URL it doesn't matter, it will still work. You can also comment anonymously, but I would love to know at least what your name is.
AND you can also tell me with a simple click what you think of each post.
More exciting stuff coming soon, I promise :-)