Saturday, 27 November 2010
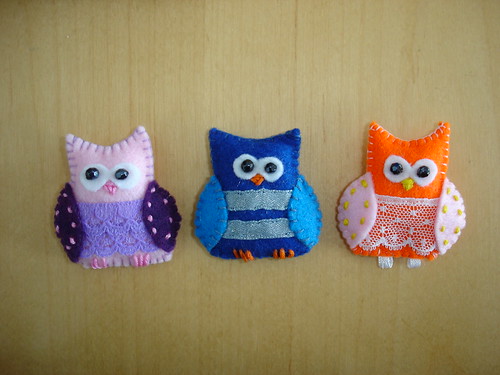
Owls
I've been at the felt again! Making these little owl brooches is great fun. A while ago I bought felt in lots of different colours and I've been through my stash of ribbons and lace to decorate them. I have made loads of these now, you can see more of them on my flickr page - just click on the photo to get there:-).
Tuesday, 23 November 2010
Tresses au beurre

I actually made these on Sunday (which is my baking day) but have only just got around to writing up the recipe.
I love to make these because they are so pretty. On Sunday morning I made one for each of the three of us, and a larger one which I put in the freezer for another day. Here's the recipe. Bon appetit!
Makes 2 medium or 6 small tresses
500g flour
1 tsp salt
1 tbsp sugar
75g butter
300 ml milk
20g fresh yeast
1 egg for glazing
Preheat the oven to 180°C
Mix the flour, salt and sugar and rub in the butter.
Heat the milk to body temperature and add the yeast, mix until it has "melted".
Pour the milk/yeast into the flour and knead for 5-10 minutes until you have a soft springy dough.
Cover and leave to rise for 1 hour.
Knock back the dough and knead briefly again.
Separate the dough in two parts (and each again in three parts if you're making the small tresses)
Separate again each part in three parts, which you should roll with you hands to a long sausage shape.
Take the three sausage shapes and make them into a plait, making sure you tuck in the two ends well.
Do the same with the remaining pieces of dough.
Lay them onto a baking sheet, cover and leave to rise for 30 minutes approx.
Brush with beaten egg and cook in the preheated oven at 180° for 20 minutes (small size) or 30 minutes (medium size) until nicely golden.
Leave to cool. They are nice and buttery so you really don't need to add anything to them, though I must admit I like them with just a little bit of jam.
Saturday, 20 November 2010
Inauguration with music!
The small town in which I live was home to the French writer and philosopher Voltaire from 1759 to 1778.
During his stay here and because of his outlandish way of life compared to the very serious Calvinist attitude in Geneva, Voltaire was often obliged to travel to and from Geneva. According to local legend, he used a road that ran straight from his French castle to the Swiss border. The first part of the road crossed a field and was bordered with poplar trees but they were cut down "for safety reasons" in 2008. The lower part of the road has, after various agreements and conventions between the town and the local landowners, been open to walkers, joggers and cyclists since last month.

Today was the official inaurguration of the lower part of the road, named l'allée de la Tir. It was a pity the sun wasn't out today, it has been beautiful for the past three days but I suppose we all knew it couldn't last. At least it didn't rain.

The mayor and other local dignitaries made the customary speech and cut the ribbon, but for me the highlight of the morning was the wonderful band who played from the centre of town to the beginning of the allée, followed by the crowd of well-wishers who particpated in the inauguration.
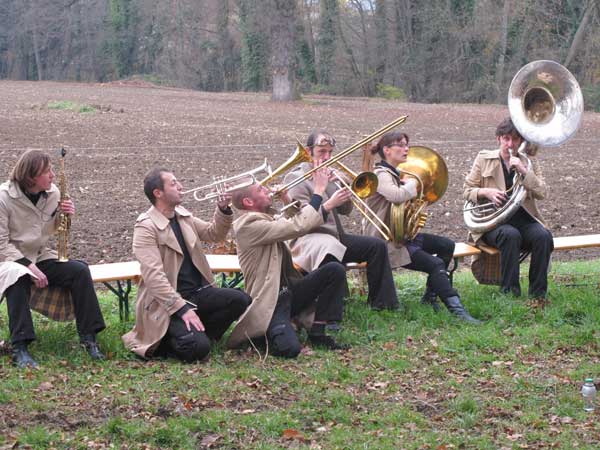


Now we're just waiting for the higher part of the road to be re-opened. It is in a large grassy park which will be further developed as an "urban park" (whatever that means). According to the town website it is open to competition among developers, and the project should be chosen by the end of 2010.
Friday, 19 November 2010
Scotch pancakes with apples
Scotch pancakes are one of my favourite breakfast recipes. They are quick and easy to prepare and appreciated by everyone I know. To make them a bit more special, I like to fry up some apple slices in butter and sugar and add put them between two pancakes, and top them with fromage frais. You could also use whipped cream but I do try to avoid too much fat (do you really believe me?) And this time I had some melted chocolate so I put a drop of that on the top too.

Here's what it looks like. And here's the recipe:

Here's what it looks like. And here's the recipe:
Scotch pancakes
To make scotch pancakes with apple filling, you'll need (for 3 or 4 servings):
For the pancakes:
120 g flour
30 g sugar
1 sachet baking powder
1 sachet vanilla sugar
1 pinch salt
150 ml milk
1 egg
Oil for cooking
For the apple filling:
4 or 5 apples
30 g butter
1 tblspn brown sugar
1 measuring jug
1 mixing bowl
2 frying pans
Start by preparing the apples, peel them and cut into slices.
Melt the butter in a frying pan, add the apples.
Cook over a medium heat, stirring occasionally to ensure even cooking
When they are nearly ready add the brown sugar and cook until it is slightly caramelised. Leave to cool
For the pancakes, mix the flour, baking powder, sugar, vanilla sugar and salt in a bowl.
In a measuring jug, measure out the milk and break the egg into the milk, mix the egg in with a hand whisk
Pour the liquid into the dry ingredients, mix well and then pour the mixture back into the measuring jug (it is easier to pour it than to spoon it out)
Warm the second frying pan, add a small amount of cooking oil and use some kitchen roll to remove the excess and spread it evenly over the pan.
Gently pour small quantities of the mixture in the pan to make the pancakes, keeping them at about 8cm in diameter.
When bubbles appear on the surface, gently turn them over using a fish slice or a palette knife. They should be golden with a distinctive "lacy" pattern. Do not over-cook.
Once you have finished making the pancakes, make a sandwich with the apples in the middle (see photo).
You can top with whipped cream or fromage frais, if you wish. A drop of maple syrup would also go very well with these pancakes. Bon appetit!
Sunday, 14 November 2010
Sunday is baking day


I got up early and decided to make croissants and pains au chocolate for breakfast.
I've lived in France for 27 years now, but only discovered the secret of croissant-making about five years ago. They do take a long time to prepare, about four hours from start to finish, but much of that is time waiting for the dough to rise, or the time they spend in the oven. I love to make them because they make me feel creative and all that work really is worth it when you bite into the delicious flaky, butteriness of them.
If there are any left over, they freeze very well and can be gently heated in a warm oven.
I make my croissants with organic flour, butter, milk, yeast, salt and a small amount of sugar.
Here's the recipe:
Croissants
500g flour
200g butter
300 ml milk
20g fresh yeast
1 tsp salt
1 tsp sugar
1 egg for glazing
Mix the flour, salt and sugar in a large shallow bowl/plate or directly on a work surface.
Cut 50g of butter in to small pieces and rub into the flour.
Heat the milk to hand temperature and add the yeast, mix until it has "melted".
Pour the milk/yeast into the flour and knead for 5 minutes until you have a soft springy dough.
Cover and leave it to rise for about 30 minutes, then knock it back and fold in three to make a rectangle, and roll it out on a floured surface.
Cut the remaining butter in two pieces and, using plenty of flour and a rolling pin, start by bashing it and then roll it in the flour until you have a large flat "leaf" of butter. Do the same with the second piece of butter.
Now cover the lower 2/3 of the dough rectangle with the butter, fold down the top 1/3 downwards and the bottom 1/3 upwards.
Tuck in the edges to stop the butter from escaping, then put the open side to the right and roll out the dough again.
Fold and roll the dough in the same way two more times.
Now put the dough in a floured plastic bag, in the refrigerator and leave it to rise for one hour.
Roll the dough out again into a rectangle, which you will cut down the middle lengthwise.
Cut each length into several triangles (for the croissants) and rectangles (for the pains au chocolate).
For the croissants, roll the triangles up from the long base towards the point of the triangle, keeping it fairly tight. Then turn the ends towards each other to make a croissant shape.
For the pains au chocolat, place a smallish piece of chocolate at the short end of the rectangle and roll up, making sure you leave the "seam" on the underside.
Cover and leave your croissants and pains au chocolat to rise again for about 20 minutes.
Brush them with beaten egg, and place them in a pre-heated oven at 200°C for around 20 minutes or until nicely golden.
Best eaten warm!

Then in the afternoon here's what I made: an apple tart. The pastry looks a bit over-cooked but it was nice and crispy lol. I cheated a bit because I lined my pastry with apple sauce, it keeps the whole thing nice and moist.This was for afternoon tea. That's a lot of butter in one day - maybe it's a good job I only have time to make patisseries at the weekend!
Thursday, 11 November 2010
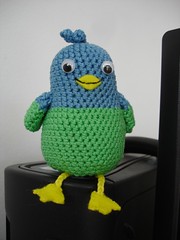
Feathers
A few weeks ago I met Aral Balkan at a communications meeting. He is the man behind the Feathers app for iPhone. Feathers brings a whole new life to tweeting.
With the app you can use novel fonts, pictures and even coded messages, using Twitter, facebook, msn or simple texting. The cute Feathers bird shows the app user how much they've used their character limit. As the limit draws near, the little blue bird becomes green. And if you overstep the limit, it becomes red. My little bird has used a bit more than half the character limit, so it's still blue but slowly becoming green. You can see the real thing on the app, for more information tweet @aral, or see more about it on feathersapp.com.
My version of the feathers bird isn't really suitable for young children because of the small parts. If you want to give it to a child, please make sure you adjust the pattern to make it safe, especially as regards the eyes and feet.
Here's the pattern:
Stitches used:
sc single crochet
ss slip stitch
dc double crochet
hdc half double crochet
I used Catania cotton and a 2.5 mm crochet hook, and scraps of yellow felt for the beak and feet.
Head feather
Start with the head feather, which you will later attach to the top of your bird.
With blue, ch 12, turn.
Work 2 sc into each ch to end. Fasten off, leaving a long tail to sew the head feather to the inside of the head.
Head and body
Rnd 1 - With blue, work 6 sc into a magic circle.
Rnd 2 - 2 sc into each st (12 sc)
Rnd 3 - * 1 sc in next st, 2 sc in next st, rep from * to end (18 sc)
Rnd 4 - * 1 sc in next 2 sts, 2sc in next st, rep from * to end (24 sc)
Rnd 5 - * 1 sc in next 3 sts, 2sc in next st, rep from * to end (30 sc)
Rnd 6-13 - sc around
Rnd 14 - * 1 sc in next 4 sts, 2sc in next st, rep from * to end (36 sc)
Rnd 15 - sc around
Now's a good time to attach the head feather by threading it through the small hole at the middle of the initial magic circle. Sew it firmly to the inside so it can't be pulled off!
Sew on the eyes and the beak. I used sew-on goggly eyes because I found they resembled the original bird the most, but you can use safety eyes, or sew on felt eyes, or just embroider them if you prefer. For the beak I used a small piece of yellow felt and embroidered the smile :)
Continue in green.
Rnd 16 - * 1 sc in next 5 sts, 2sc in next st, rep from * to end (42 sc)
Rnd 17-24 - sc around
Rnd 25 - * 1 sc in next 5 sts, sc2tog, rep from * to end (36 sc)
Rnd 26 - sc around
Rnd 27 - * 1 sc in next 5 sts, sc2tog, rep from * to end (36 sc)
Rnd 28 - * 1 sc in next 4 sts, sc2tog, rep from * to end (30 sc)
Rnd 30 - * 1 sc in next 3 sts, sc2tog, rep from * to end (24 sc)
Rnd 31 - * 1 sc in next 2 sts, sc2tog, rep from * to end (18 sc)
Stuff!
Rnd 32 - * 1 sc in next st, sc2tog, rep from * to end (12 sc)
Rnd 33 - sc2tog 6 times, draw the yarn through remaining stitches and pull closed. Weave in ends.
Wings (make 2)
Rnd 1- with blue, ch 14, join to first ch with a ss to make a ring.
Rnd 2 - 2ch, 1 dc in each chain to end , join to the top of 2 ch (14 dc)
Continue in green.
Rnd 3 - 1 sc in each st (14 sc)
Rnd 4 - [sc2tog, 1 sc in next 5 st] twice (12 sc)
Rnd 5 - [sc2tog, 1 sc in next 4 st] twice (10 sc)
Rnd 6 - sc around
Rnd 7 - sc2tog 5 times.
Finish off leaving a tail of yarn, weave the yarn through the last 5 sts, pull tight to close. Weave in ends.
Tail
Rnd 1 - With green, work 12 dc into a magic circle
Rnd 2 - 2 dc into each st (24 dc)
Now fold it in half so it makes a semi-circle shape and work into both layers of stitches, joining them together.
Rnd 3 - 2 ch, skip the first st, 1 hdc in next 3 st, 1 dc in next 4 st, 1 hdc in next 4 st to end. Fasten off, leaving a tail of yarn to sew the tail to the body.
Legs and feet (make 2)
With yellow, ch 10. Fasten off, leaving a tail of yarn to sew the leg to the body.
With yellow felt, cut out four feet shapes, and make a small split in two of them at the heel end (these are the tops of the feet). Attach the end of the chain in the split, sew it in place, and then sew the bottom pieces of felt to the tops with blanket stitch all around.
Sew the legs to the bottom of the bird.
Sew the wings in place, aligning the blue/green separation with the one on the body.
Sew the tail to the back.
You can of course make the bird all in blue, or alter the green/blue limit. You could even make a red/green bird, or a totally red one. See the app for further inspiration, and please leave me a comment if you make one of these little guys. I would love to see your photos too!
If there are any problems with the pattern, please let me know.
Thursday, 4 November 2010
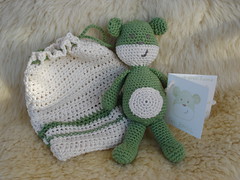
Basil
Whatever happened to October? I've been so busy at work and at home I've simply not had time to deal with my blog.
I have, however, finished my last project and I'm pleased to introduce Basil. Basil will be going to a new home in Canada, with his drawstring bag and little visiting card. I made Basil with organic cotton and he's stuffed with recycled wool, so he is a 100% organic bear. Oh and he's also made with my chubby teddy pattern, though I did make some minor changes, including making the head and body in a single piece.
I really loved working with the organic cotton, it's very soft - the only negative thing about it is the cost, but the sheer enjoyment of handling the lovely soft cotton yarn makes it worth it. I'll definitely be buying more.
For the wool filling, I recuperated an old and slightly holey woollen blanket that I'd had lying in a cupboard for years and years, machine washed it at a high temperature, and cut it into small pieces suitable for stuffing. I have plenty now to make lots and lots of toys.It's heavier and lumpier than polyfill but I suppose that's normal for a natural fibre.
Basil's visiting card has the following message: I'm BASIL an original organic cotton bear stuffed with recycled wool. I've been made with love and care in a smoke-free and pet-free home. Please wash me in cool water with a detergent that respects the environment. Meet my friends on our blog (with the address of this blog on the last page).
Subscribe to:
Posts (Atom)