A few weeks ago I met Aral Balkan at a communications meeting. He is the man behind the Feathers app for iPhone. Feathers brings a whole new life to tweeting.
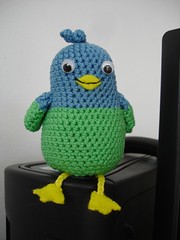
With the app you can use novel fonts, pictures and even coded messages, using Twitter, facebook, msn or simple texting. The cute Feathers bird shows the app user how much they've used their character limit. As the limit draws near, the little blue bird becomes green. And if you overstep the limit, it becomes red. My little bird has used a bit more than half the character limit, so it's still blue but slowly becoming green. You can see the real thing on the app, for more information tweet @aral, or see more about it on feathersapp.com.
My version of the feathers bird isn't really suitable for young children because of the small parts. If you want to give it to a child, please make sure you adjust the pattern to make it safe, especially as regards the eyes and feet.
Here's the pattern:
Stitches used:
sc single crochet
ss slip stitch
dc double crochet
hdc half double crochet
I used Catania cotton and a 2.5 mm crochet hook, and scraps of yellow felt for the beak and feet.
Head feather
Start with the head feather, which you will later attach to the top of your bird.
With blue, ch 12, turn.
Work 2 sc into each ch to end. Fasten off, leaving a long tail to sew the head feather to the inside of the head.
Head and body
Rnd 1 - With blue, work 6 sc into a magic circle.
Rnd 2 - 2 sc into each st (12 sc)
Rnd 3 - * 1 sc in next st, 2 sc in next st, rep from * to end (18 sc)
Rnd 4 - * 1 sc in next 2 sts, 2sc in next st, rep from * to end (24 sc)
Rnd 5 - * 1 sc in next 3 sts, 2sc in next st, rep from * to end (30 sc)
Rnd 6-13 - sc around
Rnd 14 - * 1 sc in next 4 sts, 2sc in next st, rep from * to end (36 sc)
Rnd 15 - sc around
Now's a good time to attach the head feather by threading it through the small hole at the middle of the initial magic circle. Sew it firmly to the inside so it can't be pulled off!
Sew on the eyes and the beak. I used sew-on goggly eyes because I found they resembled the original bird the most, but you can use safety eyes, or sew on felt eyes, or just embroider them if you prefer. For the beak I used a small piece of yellow felt and embroidered the smile :)
Continue in green.
Rnd 16 - * 1 sc in next 5 sts, 2sc in next st, rep from * to end (42 sc)
Rnd 17-24 - sc around
Rnd 25 - * 1 sc in next 5 sts, sc2tog, rep from * to end (36 sc)
Rnd 26 - sc around
Rnd 27 - * 1 sc in next 5 sts, sc2tog, rep from * to end (36 sc)
Rnd 28 - * 1 sc in next 4 sts, sc2tog, rep from * to end (30 sc)
Rnd 30 - * 1 sc in next 3 sts, sc2tog, rep from * to end (24 sc)
Rnd 31 - * 1 sc in next 2 sts, sc2tog, rep from * to end (18 sc)
Stuff!
Rnd 32 - * 1 sc in next st, sc2tog, rep from * to end (12 sc)
Rnd 33 - sc2tog 6 times, draw the yarn through remaining stitches and pull closed. Weave in ends.
Wings (make 2)
Rnd 1- with blue, ch 14, join to first ch with a ss to make a ring.
Rnd 2 - 2ch, 1 dc in each chain to end , join to the top of 2 ch (14 dc)
Continue in green.
Rnd 3 - 1 sc in each st (14 sc)
Rnd 4 - [sc2tog, 1 sc in next 5 st] twice (12 sc)
Rnd 5 - [sc2tog, 1 sc in next 4 st] twice (10 sc)
Rnd 6 - sc around
Rnd 7 - sc2tog 5 times.
Finish off leaving a tail of yarn, weave the yarn through the last 5 sts, pull tight to close. Weave in ends.
Tail
Rnd 1 - With green, work 12 dc into a magic circle
Rnd 2 - 2 dc into each st (24 dc)
Now fold it in half so it makes a semi-circle shape and work into both layers of stitches, joining them together.
Rnd 3 - 2 ch, skip the first st, 1 hdc in next 3 st, 1 dc in next 4 st, 1 hdc in next 4 st to end. Fasten off, leaving a tail of yarn to sew the tail to the body.
Legs and feet (make 2)
With yellow, ch 10. Fasten off, leaving a tail of yarn to sew the leg to the body.
With yellow felt, cut out four feet shapes, and make a small split in two of them at the heel end (these are the tops of the feet). Attach the end of the chain in the split, sew it in place, and then sew the bottom pieces of felt to the tops with blanket stitch all around.
Sew the legs to the bottom of the bird.
Sew the wings in place, aligning the blue/green separation with the one on the body.
Sew the tail to the back.
You can of course make the bird all in blue, or alter the green/blue limit. You could even make a red/green bird, or a totally red one. See the app for further inspiration, and please leave me a comment if you make one of these little guys. I would love to see your photos too!
If there are any problems with the pattern, please let me know.
Thursday, 11 November 2010

Thursday, 4 November 2010
Basil
Whatever happened to October? I've been so busy at work and at home I've simply not had time to deal with my blog.
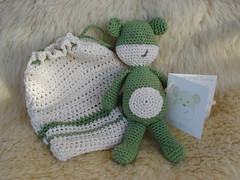
I have, however, finished my last project and I'm pleased to introduce Basil. Basil will be going to a new home in Canada, with his drawstring bag and little visiting card. I made Basil with organic cotton and he's stuffed with recycled wool, so he is a 100% organic bear. Oh and he's also made with my chubby teddy pattern, though I did make some minor changes, including making the head and body in a single piece.
I really loved working with the organic cotton, it's very soft - the only negative thing about it is the cost, but the sheer enjoyment of handling the lovely soft cotton yarn makes it worth it. I'll definitely be buying more.
For the wool filling, I recuperated an old and slightly holey woollen blanket that I'd had lying in a cupboard for years and years, machine washed it at a high temperature, and cut it into small pieces suitable for stuffing. I have plenty now to make lots and lots of toys.It's heavier and lumpier than polyfill but I suppose that's normal for a natural fibre.
Basil's visiting card has the following message: I'm BASIL an original organic cotton bear stuffed with recycled wool. I've been made with love and care in a smoke-free and pet-free home. Please wash me in cool water with a detergent that respects the environment. Meet my friends on our blog (with the address of this blog on the last page).
I have, however, finished my last project and I'm pleased to introduce Basil. Basil will be going to a new home in Canada, with his drawstring bag and little visiting card. I made Basil with organic cotton and he's stuffed with recycled wool, so he is a 100% organic bear. Oh and he's also made with my chubby teddy pattern, though I did make some minor changes, including making the head and body in a single piece.
I really loved working with the organic cotton, it's very soft - the only negative thing about it is the cost, but the sheer enjoyment of handling the lovely soft cotton yarn makes it worth it. I'll definitely be buying more.
For the wool filling, I recuperated an old and slightly holey woollen blanket that I'd had lying in a cupboard for years and years, machine washed it at a high temperature, and cut it into small pieces suitable for stuffing. I have plenty now to make lots and lots of toys.It's heavier and lumpier than polyfill but I suppose that's normal for a natural fibre.
Basil's visiting card has the following message: I'm BASIL an original organic cotton bear stuffed with recycled wool. I've been made with love and care in a smoke-free and pet-free home. Please wash me in cool water with a detergent that respects the environment. Meet my friends on our blog (with the address of this blog on the last page).
Monday, 27 September 2010
Chubby panda
Having received a couple of messages concerning difficulties in my chubby teddy pattern, I decided to try it again so I could make the necessary changes. Instead of making another teddy, I decided to alter it slightly and here's the result: Chubby Panda!!
Chubby Panda has black felt around his eyes. His head is all white, and the body is white except for the last four rows, for which I changed the colour to black. I gave him shorter legs than the chubby teddies, and slightly bigger ears. I made Chubby Panda in DK yarn, and I'm pleased with the result. He's really chubby!
Here's the link straight to the my pattern:
http://isitatoy.blogspot.com/2010/07/chubby-teddies-free-pattern.html

Chubby Panda has black felt around his eyes. His head is all white, and the body is white except for the last four rows, for which I changed the colour to black. I gave him shorter legs than the chubby teddies, and slightly bigger ears. I made Chubby Panda in DK yarn, and I'm pleased with the result. He's really chubby!
Here's the link straight to the my pattern:
http://isitatoy.blogspot.com/2010/07/chubby-teddies-free-pattern.html
Saturday, 25 September 2010
Atashi
Originally uploaded by aishakenza
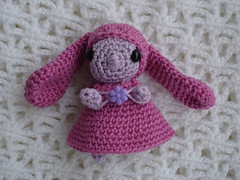
I'm very busy both at home and at work at the moment, but I still try to find time to do at least a little bit of crochet. Small, short projects are my favourites at the moment. I found this really cute pattern here, and it was so much fun to make. Each part is made separately and then sewn together so it's easy to spread over a few days. At just 8 cm tall, this little rabbit (I think) is just perfect. Apparently, it's from an anime and is called Atashi, but I've never heard of it before, I just found it so cute. Normally it should be holding a star but I didn't have one. I did however find a cute lilac flower in my beads box, and I felt it would suit. You can't see her feet very well in the photo, but she does have two, honest!
Thursday, 23 September 2010
Moko the cat
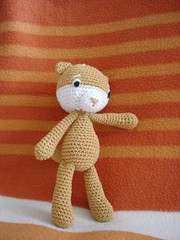
I made this little cat for a swap on flickr. The amigurumi group that I'm a member of arranges swaps between its members - each person has to make an amigurumi and send it to another designated member together with other goodies like yarn, eyes, buttons, ribbons, etc. You receive a parcel from a different member, and it's a nice way to share. It's always so lovely to receive a package through the post! And it's as much fun to send one too. The Moko pattern is available again after being offline for a while and is really fun to make. It's quick and easy and turns out really cute. You can find the pattern here. Enjoy!
Wednesday, 8 September 2010
Bright, bright, bright

Aren't those colours just gorgeous? I've been shopping again. The lovely lady who sells yarn at our local market had a sale on, and I just couldn't resist stocking up on my favourite cotton yarn. It is rather thin, about equivalent to 4-ply, and I crochet it with a 2.5mm hook, so it's not good for doing large projects. But it is ideal for little things, and I chose bright colours with lots creative ideas in mind.She even offered me an extra one for free.

Friday, 3 September 2010
Little felt elephant

Subscribe to:
Posts (Atom)